Syncing Arvee To Your Calendar
Arvee supports iCal for both active trips and reminders attached to those trips, allowing you to bring your planning activities into your favorite calendar application on any device.
Activating iCal sync
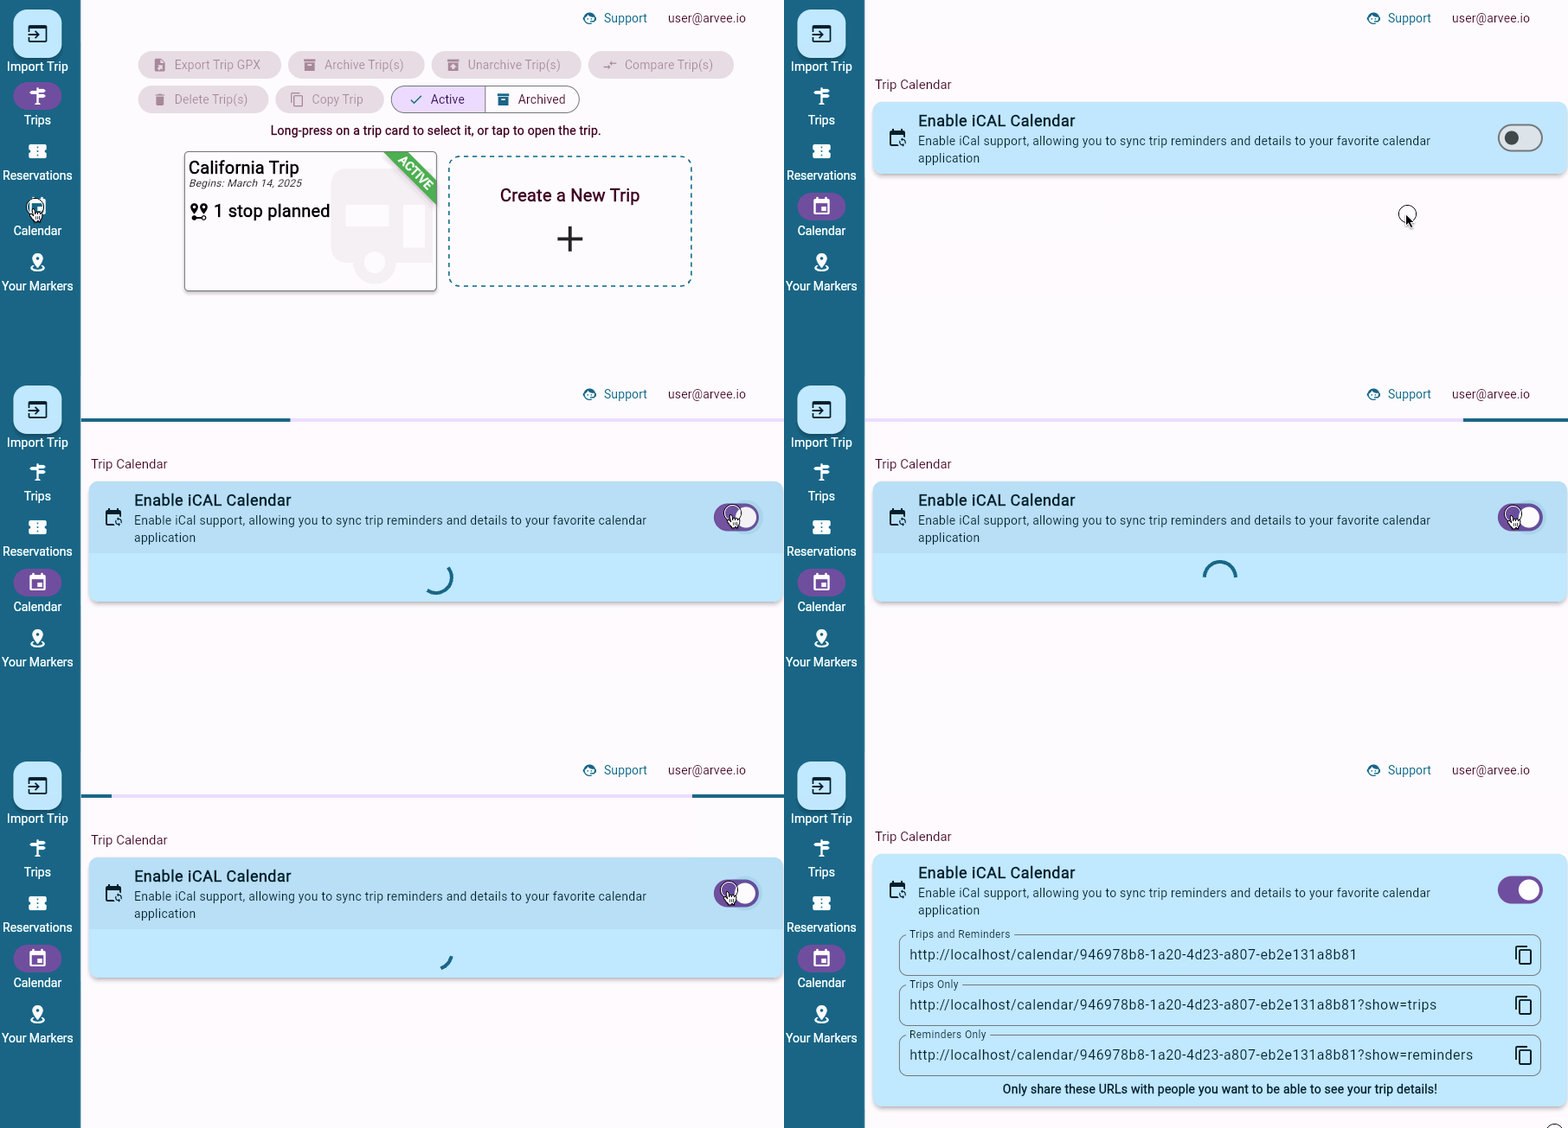
To activate iCal support in your account, from the main planner page click the “Calendar” menu item. This will bring up the calendar settings page where you can enable your calendar.
Once in the calendar settings, click the switch next to “Enable iCal Calendar” to enable the feature.
As is true with many aspects of Arvee, before you can use this feature you must have at least one trip created.

Understanding the different calendar URLs
Once enabled you will be given three separate subscription URLs – one of all of which can be imported into your favorite calendar application. Which one to choose depends on your own preferences and what you would like imported into your calendar.
- Reminders Only: A calendar that only provides events for configured reminders in your trips, without trip details
- Trips Only: A calendar that only provides events for destinations of your trip(s) based on arrival / departure dates
- Reminders and Trips: A combined calendar that provides both trips and reminders together
Do not share this URL with anyone who you would not want to have access to your calendar and trip data!
What trips / reminders will be displayed?
The data provided to the calendar feed is based on Active Trips. If you have multiple active trips, it will include all of the relevant data from all of them. To limit what data is provided to the calendar, make sure you mark your trips as “archived” if they are no longer used.
Importing iCal into Common Calendar Applications
To help, here is a detailed guide on how to import iCal into Google Calendar, Microsoft Outlook, and Apple’s Calendar applications.
Importing into Google Calendar
Google Calendar is a widely used application for organizing schedules. To import your Arvee iCal URL into Google Calendar, follow these steps:
- Open Google Calendar: Log in to your Google account and open Google Calendar.
- Locate ‘Other Calendars’: On the left-hand side, find the section labeled
Other Calendars. - Select ‘Add Other Calendars’: Click on the plus (+) icon next to
Other Calendars. - Choose ‘From URL’: In the drop-down menu, select
From URL. - Enter the iCal URL: Paste your Arvee iCal subscription URL into the text field.
- Click ‘Add Calendar’: The Arvee calendar will now sync and appear in your Google Calendar
Importing into Microsoft Outlook
Microsoft Outlook is another popular choice for managing emails and calendars. To add your Arvee iCal URL to Outlook, do the following:
- Open Outlook Calendar: Launch your Microsoft Outlook application and go to the Calendar view.
- Navigate to ‘Add Calendar’: Find the
Add Calendaroption in the toolbar. - Select ‘From Internet’: Choose the
From Internetoption to add a new calendar. - Input the iCal URL: Paste your Arvee iCal subscription URL when prompted.
- Confirm and Add: Click
Yesto confirm that you want to add this calendar to Outlook.
Importing into Apple macOS Calendar
For users of Apple devices, integrating with the Apple Calendar is a seamless process. Here’s how to import your Arvee iCal URL:
- Open Apple Calendar: Launch the Calendar app on your Apple device.
- Choose ‘File’: In the menu bar at the top of the screen, click on
File. - Select ‘New Calendar Subscription’: From the dropdown menu, select
New Calendar Subscription. - Enter the iCal URL: Paste your Arvee iCal subscription URL into the given field.
- Customize Settings: Choose your preferred settings for how often the calendar updates.
- Complete the Process: Click
Subscribeto finalize the addition of your Arvee calendar.